Creamy Banana Bliss Pops Recipe
In recent years, the trend of healthy frozen treats has skyrocketed, with more people seeking out nutritious options that satisfy their sweet cravings without the guilt. Among the myriad of choices available, Creamy Banana Bliss Pops stand out as a delightful and wholesome alternative to traditional store-bought popsicles. These homemade treats not only promise a burst of flavor but also pack a nutritional punch, making them perfect for family snacks, summer gatherings, or a refreshing dessert.
At the heart of the Creamy Banana Bliss Pops recipe are a few key ingredients that contribute to their delicious taste and health benefits. With ripe bananas, creamy peanut butter, and protein-rich Greek yogurt, this recipe offers a harmonious blend of nutrition and indulgence. Whether you’re looking to cool off on a hot day or simply want to enjoy a sweet moment without compromising your health, these pops are sure to become a staple in your home.
Understanding the Ingredients
Bananas: A Nutrient Powerhouse
Bananas are often hailed as one of nature’s most convenient and nutritious snacks. They are rich in potassium, which is essential for heart health and maintaining normal blood pressure. In addition to potassium, bananas provide dietary fiber, which aids digestion and contributes to a feeling of fullness. The vitamins found in bananas, particularly vitamin C and vitamin B6, support immune function and energy metabolism.
For this recipe, using ripe bananas is crucial. As they ripen, bananas develop natural sweetness and become creamier in texture, making them the perfect base for popsicles. The natural sugars in ripe bananas can reduce the need for added sweeteners, allowing the flavor of the fruit to shine through. With each bite, you can enjoy the creamy consistency and the delightful sweetness that only ripe bananas can provide.
Peanut Butter: A Source of Healthy Fats
Peanut butter is another star ingredient in these pops, offering numerous health benefits. It is a fantastic source of protein, which helps build and repair tissues, and provides healthy fats that are essential for overall well-being. Additionally, peanut butter contains various vitamins and minerals, including vitamin E, magnesium, and niacin.
When selecting peanut butter for your Creamy Banana Bliss Pops, you can choose between creamy and crunchy varieties, depending on your texture preference. Creamy peanut butter blends smoothly into the mixture, creating a uniform texture, while crunchy peanut butter adds delightful little bits of crunch that can enhance the overall experience. Regardless of your choice, ensure you opt for natural peanut butter with minimal added ingredients to maximize the health benefits.
Greek Yogurt: Creamy and Protein-Packed
Greek yogurt is a wonderful addition to this recipe, contributing not only creaminess but also a substantial amount of protein. It contains probiotics that promote gut health, making it a great choice for those looking to improve their digestive system. Additionally, Greek yogurt is lower in sugar and higher in protein than regular yogurt, which aids in satiety and muscle recovery.
For those with dietary restrictions or lactose intolerance, there are excellent dairy-free yogurt alternatives available on the market. Coconut, almond, and soy-based yogurts can be used as substitutes, ensuring that everyone can enjoy these delicious pops without concern for their dietary needs.
Sweeteners: Honey vs. Maple Syrup
While ripe bananas add natural sweetness to the pops, you might want to enhance the flavor further with a sweetener. Honey and maple syrup are both excellent options, each bringing a unique taste profile to the recipe. Honey tends to be sweeter and has a floral undertone, while maple syrup offers a rich, earthy flavor that can complement the bananas beautifully.
When choosing between the two, consider your dietary needs and personal preferences. Honey is not suitable for vegans, while maple syrup is a plant-based option. Additionally, both sweeteners have different glycemic indexes, so understanding how they affect blood sugar levels can help you make an informed decision.
Dark Chocolate: A Touch of Indulgence
To elevate your Creamy Banana Bliss Pops, consider adding a drizzle of dark chocolate. Dark chocolate is not only a delicious treat but also offers numerous health benefits, including antioxidants that combat free radicals and support heart health. Its rich flavor pairs beautifully with the sweetness of the bananas and the nuttiness of the peanut butter, creating a harmonious blend of tastes.
While the chocolate drizzle is entirely optional, it can add a layer of indulgence to your pops that makes them feel even more like a decadent dessert. If you prefer to keep things simple or are looking to reduce sugar content, feel free to skip the chocolate or use a sugar-free alternative.
Step-by-Step Recipe Instructions
Now that we have explored the delicious ingredients that make up Creamy Banana Bliss Pops, let’s dive into the initial steps of preparing this delightful treat.
Preparing the Bananas
Start by selecting perfectly ripe bananas. Look for ones that are yellow with a few speckles; this indicates optimal ripeness. Overripe bananas are also suitable, as they will be even sweeter and creamier. Peel the bananas and place them in a mixing bowl. Using a fork or a potato masher, mash the bananas until they are smooth and free of lumps. The goal is to achieve a creamy consistency that will serve as the base for your pops.
Once mashed, you can incorporate the other ingredients right into the same bowl. Add in your choice of peanut butter and Greek yogurt, mixing until everything is well-combined. This not only saves on dishes but ensures that every bite of your pops will be infused with the delightful flavors of banana, peanut butter, and yogurt.
As you prepare the mixture, you can also decide how sweet you want your pops to be. If you prefer a sweeter treat, drizzle in some honey or maple syrup and taste the mixture. Adjust the sweetness to your liking, keeping in mind that the pops will be slightly less sweet once frozen.
Now that your banana mixture is ready, you can proceed to pour it into your chosen molds. If you don’t have popsicle molds, small paper cups with wooden sticks or silicone molds can work just as well. Fill the molds with the banana mixture, leaving a little space at the top to allow for expansion during freezing.
Once filled, insert the sticks into the molds. If you’re using paper cups, place the sticks in the center of each cup. Be sure to secure them in place so they won’t topple over during the freezing process.
Next, place the molds in the freezer for at least 4 to 6 hours, or until completely frozen. This chilling period allows the flavors to meld and the pops to achieve the perfect creamy consistency.
Stay tuned for the next portion of the recipe, where we’ll explore the finishing touches that will take your Creamy Banana Bliss Pops to the next level, including the optional chocolate drizzle and creative serving suggestions!
Creating your own frozen treats at home not only ensures you know exactly what goes into them but also allows for endless customization to suit your taste preferences. The Creamy Banana Bliss Pops are an excellent example of a healthy dessert that is both easy to make and incredibly satisfying. In this section, we will delve into the preparation, blending, and freezing processes, as well as provide some delightful serving suggestions and tips for enjoying these pops to the fullest.
Choosing Ripe Bananas for Optimal Flavor
Before you start making your Creamy Banana Bliss Pops, it’s essential to choose the right bananas. Look for bananas that are fully ripe, with a bright yellow peel and a few brown spots. Ripe bananas are sweeter and have a more intense flavor, which will enhance your pops considerably. If your bananas are too green, they will lack the natural sweetness needed for this recipe. You can speed up the ripening process by placing them in a brown paper bag at room temperature for a day or two.
Blending the Ingredients
Once you have your ripe bananas, it’s time to blend the ingredients. Here’s how to do it:
1. Prepare Your Blender: Start by peeling the bananas and breaking them into chunks. This helps the blending process and ensures a smooth consistency.
2. Combine Ingredients: In your blender, add the banana chunks along with your chosen nut butter (like peanut or almond butter) and a splash of vanilla extract. If you’re using any add-ins, like a scoop of protein powder or a dash of cinnamon, include those as well.
3. Blend to Perfection: Start blending on a low setting, gradually increasing to high speed. Blend until the mixture reaches a creamy, smooth texture. You want it to be thick enough to hold its shape but smooth enough to pour easily into molds. If the mixture is too thick, you can add a little milk or dairy alternative to achieve your desired consistency.
Adjusting Sweetness
Taste testing is an important part of the recipe-making process. After blending the ingredients, take a small spoonful of the mixture to check the sweetness. If you find that it isn’t sweet enough for your liking, consider adding a drizzle of honey, maple syrup, or a few pitted dates to the blender. Blend again until combined and taste once more. Remember, the sweetness can be adjusted according to your personal preference or dietary needs.
Filling the Molds
Now that your mixture is perfectly blended, it’s time to fill the molds:
1. Prepare the Molds: Choose your popsicle molds. Silicone molds work especially well as they make it easier to pop the frozen treats out later.
2. Pouring the Mixture: Carefully pour the creamy banana mixture into the molds, filling each one about three-quarters full. Leave a little space at the top for expansion during freezing.
3. Spacing: If you’re using a mold that holds multiple pops (like a tray), ensure you pour evenly into each section to maintain similar sizes. This ensures that they freeze uniformly and are easy to serve.
Inserting Sticks and Freezing
Inserting the sticks correctly is crucial for easy handling later:
1. Insert Sticks: After filling the molds, gently insert the popsicle sticks into the center of each pop. If the mixture is too soft, you may need to freeze them for about 30 minutes first to help the sticks stand upright.
2. Freezing: Once the sticks are in place, carefully transfer the molds to the freezer. Allow the pops to freeze for at least 4-6 hours, or until they are completely solid. For best results, freeze overnight.
Optional Chocolate Drizzle Preparation
If you want to take your Creamy Banana Bliss Pops to the next level, consider adding a chocolate drizzle. Here’s how to do it safely:
1. Melting the Chocolate: You can use either a microwave or a double boiler. For the microwave, place your chocolate chips in a microwave-safe bowl and heat in 30-second intervals, stirring in between until smooth. If using a double boiler, heat water in a saucepan and place a heatproof bowl on top with the chocolate inside, stirring until melted.
2. Safety Tips: Be cautious not to overheat the chocolate, as it can become lumpy and lose its smooth texture. If this happens, you can add a teaspoon of coconut oil to help restore its consistency.
Unmolding the Pops
Once your pops have frozen solid, it’s time to remove them from the molds:
1. Loosen the Molds: If using silicone molds, gently squeeze the sides to help loosen the pops. For hard plastic molds, run warm water over the outside for a few seconds to help release them.
2. Remove Carefully: Gently pull the pops from their molds. If they resist, do not force them, as this could cause them to break. Instead, try loosening them further with warm water.
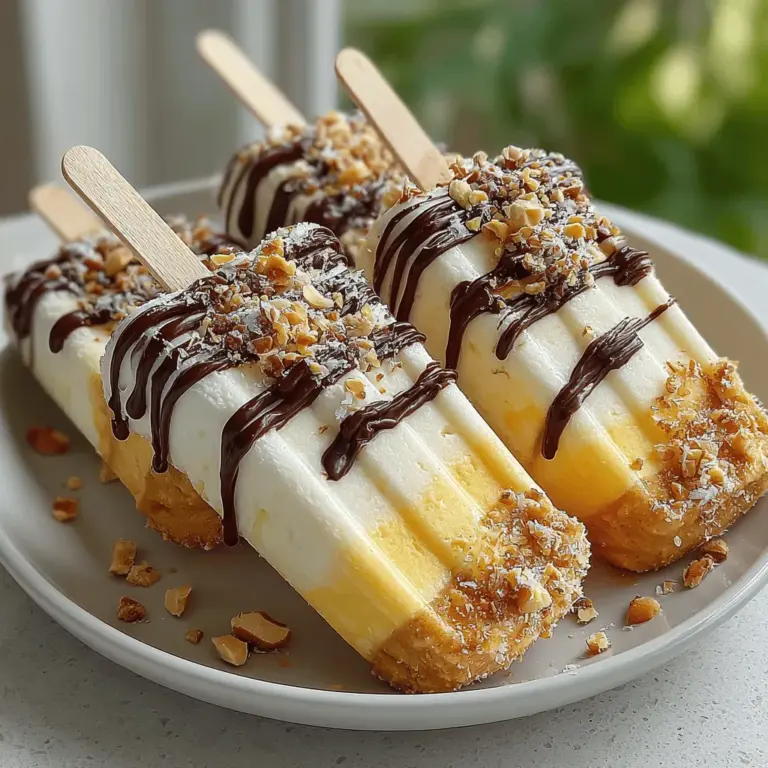
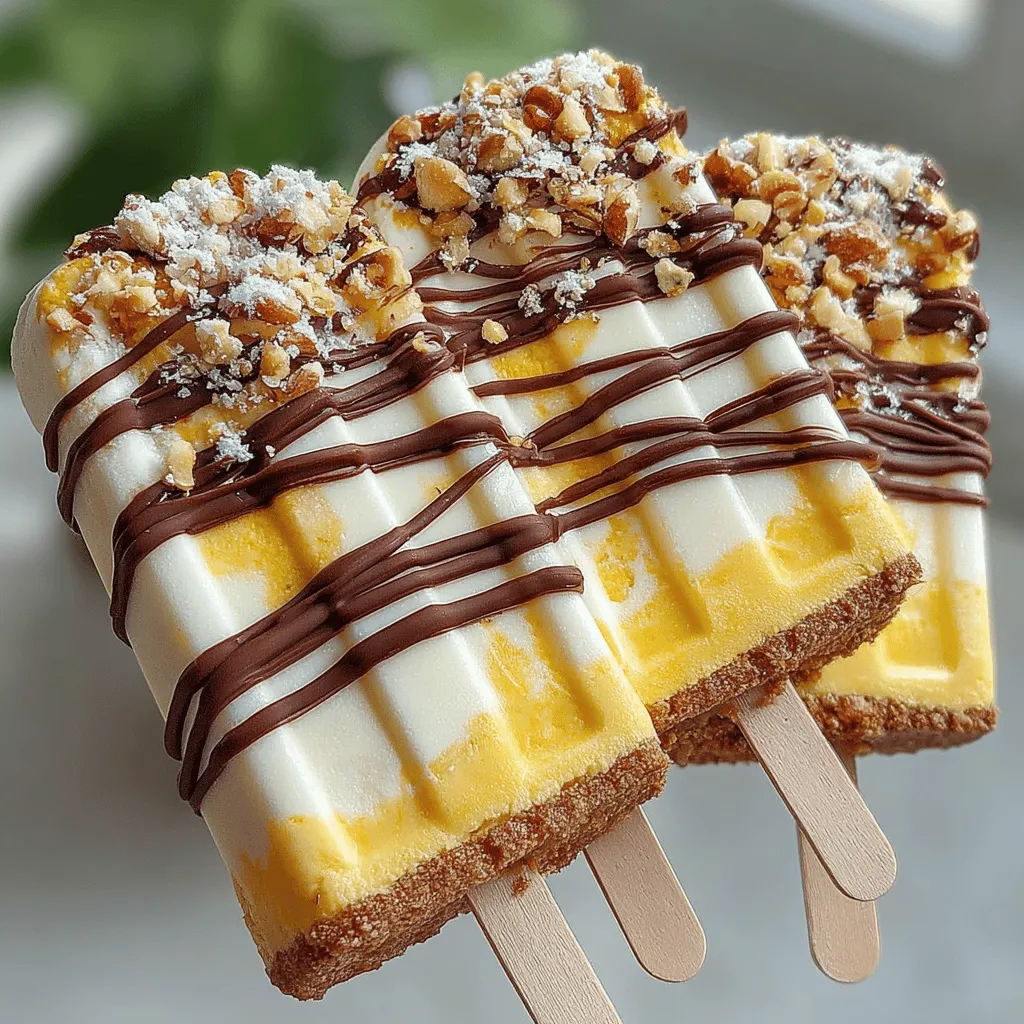
Drizzling and Decorating
Now for the fun part: decorating your pops!
1. Drizzling Chocolate: Once unmolded, place the pops on a cooling rack or parchment paper. Drizzle melted chocolate over the pops using a spoon or a piping bag for more control. Allow the chocolate to set before serving.
2. Creative Toppings: You can also roll the tops of the pops in crushed nuts, sprinkles, or shredded coconut for added texture and flavor. Get creative and have fun with your toppings!
Serving Suggestions
These Creamy Banana Bliss Pops are perfect for any occasion. Here are some serving suggestions to make your treat even more enjoyable:
– On a Hot Day: Serve them at summer barbecues or picnics where they can be a refreshing dessert option.
– With Dipping Sauces: Pair them with a side of yogurt or a fruit puree for dipping. A drizzle of honey or maple syrup can also enhance the experience.
– As a Breakfast Treat: Cut the pops in half and serve them in a bowl with granola and fresh fruits for a fun breakfast alternative.
– Party Favors: These pops can also make great party favors for kids’ birthday parties or summer gatherings.
Nutritional Information
Each Creamy Banana Bliss Pop is not only delicious but also packed with nutrients. Here’s a breakdown of the nutritional information per serving (approximately one pop):
– Calories: 120
– Protein: 3g
– Fat: 5g
– Carbohydrates: 20g
– Fiber: 2g
– Sugar: 10g
These pops are a fantastic way to satisfy your sweet tooth while still enjoying a balanced diet. The combination of bananas and nut butter provides a good source of healthy fats, potassium, and protein, making them a wholesome dessert option.
Conclusion
Making Creamy Banana Bliss Pops at home allows you to enjoy a sweet treat without the guilt associated with store-bought options. Not only are they simple to prepare, but you can also customize them to fit your dietary preferences and flavor profiles. Experiment with different fruits or nut butters, and enjoy the joy of creating healthy desserts that the whole family will love.
These frozen pops are a delightful addition to any summer gathering or a refreshing snack on a warm day. By choosing to make your own, you’re not only indulging in a delicious treat but also embracing a healthier lifestyle. So gather your ingredients, get blending, and enjoy a deliciously creamy and nutritious dessert that keeps you satisfied and guilt-free!
