Title: Crispy Delight Garlic Breadsticks: The Perfect Appetizer for Any Occasion
Introduction
Garlic breadsticks are more than just an appetizer; they are a culinary delight that has a special place in the hearts of food lovers everywhere. With their crispy exterior and soft, flavorful interior, these breadsticks serve as the perfect accompaniment to a variety of meals. Whether gracing the table at an Italian restaurant, featuring in a cozy family dinner, or acting as a staple at casual gatherings, garlic breadsticks have a universal appeal that transcends cultural boundaries.
The magic of garlic breadsticks lies in their harmonious blend of rich, melted cheese, aromatic garlic, and fragrant herbs. This combination not only elevates the taste but also creates an inviting aroma that beckons everyone to the table. The satisfying crunch that gives way to a soft, chewy center is a texture experience that makes these breadsticks irresistible.
In this article, we’ll guide you through the process of making your own Crispy Delight Garlic Breadsticks, detailing the ingredients, their significance, and the steps to achieve that perfect crispy texture.
Understanding the Appeal of Garlic Breadsticks
The popularity of garlic breadsticks can be traced back to their Italian origins, where they are often served as a side dish to pasta or as a starter before the main course. In traditional Italian dining, breadsticks—known as “grissini”—are enjoyed for their ability to complement rich flavors, soak up sauces, and provide a delightful contrast to the meal’s creaminess. Their simple yet bold flavor profile makes them a beloved choice in many culinary settings.
However, garlic breadsticks have also found their way into more casual dining experiences. From family dinners to potlucks and parties, these sticks of flavor have become a go-to appetizer that appeals to both young and old. Their adaptability allows them to pair beautifully with a wide range of dishes, including marinara sauce, soups, salads, and more. Whether enjoyed alone or dipped into a savory sauce, garlic breadsticks are a versatile addition that can enhance any meal.
Ingredients That Make a Difference
The foundation of crispy garlic breadsticks lies in the quality of ingredients used. Each component plays a crucial role in creating the ideal flavor and texture that defines this dish.
– Fresh Pizza Dough: The base of the breadsticks is pivotal, and while homemade dough can offer superior flavor and texture, store-bought options provide convenience. Homemade pizza dough allows you to control the ingredients and achieve a fresh taste, while store-bought varieties can save time without sacrificing too much quality. Regardless of your choice, ensure that the dough is fresh for the best results.
– Garlic: Fresh garlic is essential for achieving the rich, aromatic flavor that garlic breadsticks are known for. Not only does garlic add a robust taste, but it also brings numerous health benefits, including anti-inflammatory and immune-boosting properties. Using fresh garlic cloves rather than pre-minced or powdered garlic will elevate the flavor profile and enhance the overall dish.
– Herbs: The addition of herbs like oregano and parsley brings depth to the garlic breadsticks. Oregano contributes a warm, slightly peppery flavor that is characteristic of Italian cuisine. Meanwhile, parsley adds a touch of freshness, balancing the richness of the garlic and cheese. Together, these herbs create a fragrant and flavorful experience.
– Cheese: Cheese is where the magic happens, as it melts beautifully and contributes to the overall richness of the breadsticks. Parmesan cheese offers a nutty, salty flavor, while mozzarella provides a gooey, stretchy texture. Combining these two types of cheese can create a delightful contrast that enhances each bite.
– Seasoning: Simple seasonings such as sea salt and black pepper are crucial for enhancing the flavors of the garlic and cheese. For those who enjoy a little heat, adding optional red pepper flakes can introduce a subtle kick that complements the dish beautifully.
Step-by-Step Guide to Making Crispy Garlic Breadsticks
Now that we understand the appeal and importance of each ingredient, let’s dive into the step-by-step process of preparing these delicious crispy garlic breadsticks. This guide will ensure clarity and ease, allowing you to replicate this dish in your own kitchen successfully.
Preparing the Dough
1. Choose Your Dough: If you opt for homemade dough, prepare it ahead of time and allow it to rise until it doubles in size. If using store-bought dough, take it out of the refrigerator and let it come to room temperature for easier handling.
2. Preheat Your Oven: Begin by preheating your oven to 425°F (220°C). This temperature is ideal for achieving that crisp exterior while keeping the inside soft and fluffy.
3. Flour Your Surface: Lightly flour a clean surface and your rolling pin to prevent sticking. If you’re using homemade dough, punch it down gently to release any air bubbles before rolling it out.
4. Roll Out the Dough: Using your rolling pin, roll the dough into a rectangle about 1/4 inch thick. The thickness is important; too thick will result in a doughy texture, while too thin may lead to overly crispy breadsticks.
5. Cutting the Breadsticks: Once the dough is rolled out, use a sharp knife or a pizza cutter to slice it into strips. Aim for about 1 inch wide to create evenly sized breadsticks.
6. Prepare for Baking: Line a baking sheet with parchment paper for easy cleanup and to prevent sticking. Place the cut breadsticks onto the baking sheet, leaving some space between each one to allow for expansion during baking.
7. Brush with Garlic Butter: In a small bowl, combine melted butter with minced fresh garlic and a sprinkle of sea salt. Brush this mixture generously over the tops of the breadsticks, ensuring each one is coated for maximum flavor.
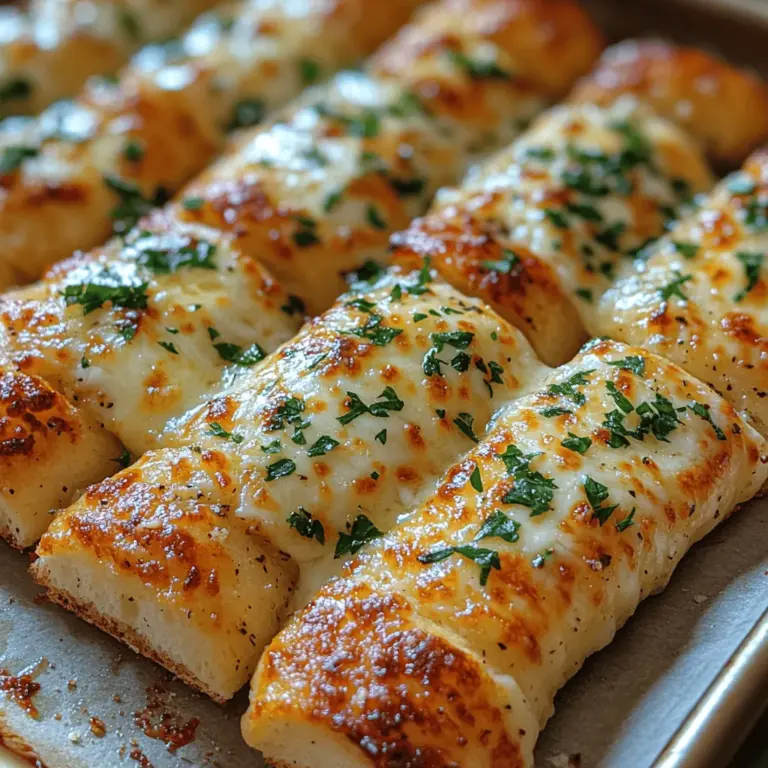
8. Add Cheese and Herbs: Sprinkle a blend of grated Parmesan and mozzarella cheese over the brushed breadsticks, followed by a light dusting of dried oregano and chopped fresh parsley. This step is crucial for enhancing flavor and achieving a delightful cheesy topping.
Following these initial steps will set you on the path to creating irresistibly crispy garlic breadsticks that are sure to impress. In the next part of this article, we’ll dive deeper into the baking process and some tips for serving and enjoying these delightful creations.

Rolling Out the Pizza Dough
To create the perfect base for your crispy garlic breadsticks, rolling out the pizza dough properly is crucial. Here are some techniques to help you achieve that ideal thickness and shape:
1. Preparation of the Dough: Start by ensuring your pizza dough is at room temperature, which makes it easier to work with. If the dough has been refrigerated, let it sit out for about 30 minutes before you begin rolling.
2. Flouring Your Surface: Lightly flour your work surface and the rolling pin to prevent sticking. Be cautious not to use too much flour, as this can alter the texture of your breadsticks.
3. Rolling Techniques: Begin by pressing down on the dough with your palms to flatten it slightly. Then, use your rolling pin to roll from the center outward, applying even pressure. Rotate the dough a quarter turn after each roll to help maintain a circular shape. Aim for a thickness of about ¼ inch; this thickness will allow for a crispy exterior while keeping the inside soft.
4. Shaping the Dough: If you prefer a rectangular shape, simply roll the dough into a rectangle, maintaining the same thickness throughout. For a more rustic look, you can use your hands to stretch the dough instead of a rolling pin.
5. Avoid Overworking: Be careful not to overwork the dough, as this can make it tough. If the dough begins to resist, let it rest for a few minutes to relax the gluten before continuing to roll.
Creating the Flavorful Garlic Butter Mixture
The garlic butter is the star of your breadsticks, contributing rich flavor and aroma. Here’s how to create a balanced garlic butter mixture:
1. Ingredients:
– Unsalted Butter: Use unsalted butter for better control over the saltiness of your mixture. It should be softened at room temperature for easy mixing.
– Fresh Garlic: Minced fresh garlic provides a robust flavor. The amount can be adjusted based on personal preference, but typically, 4-5 cloves minced will give a pungent, savory kick.
– Fresh Parsley: Chopped fresh parsley not only adds a pop of color but also a fresh note that complements the garlic.
– Salt and Pepper: These enhance the overall flavor profile. Use sea salt for a little crunch and freshly ground black pepper for a hint of spice.
2. Mixing the Ingredients: In a bowl, combine the softened butter, minced garlic, chopped parsley, and a pinch of salt and pepper. Use a fork or spatula to mix thoroughly until well blended. Taste the mixture to ensure a perfect balance; add more garlic or salt as needed.
3. Significance of Each Ingredient: The butter serves as a base for flavor, while garlic brings that classic savory note. Parsley brightens the mixture, and salt amplifies all the flavors. This blend is essential for achieving that mouthwatering aroma and taste once baked.
Applying the Garlic Butter and Cheese
Now it’s time to spread that delicious garlic butter and sprinkle the cheese onto your rolled-out dough:
1. Even Distribution of Garlic Butter: Using a spatula or a brush, spread the garlic butter mixture evenly over the surface of the dough, leaving about a ½ inch border around the edges. This ensures that the edges turn crispy without burning.
2. Cheese Sprinkling Techniques: After applying the garlic butter, sprinkle a layer of shredded mozzarella cheese over the top. For maximum coverage, use your hands to gently toss the cheese over the dough, allowing for an even distribution. You can also mix in some Parmesan cheese for added depth of flavor.
3. Cheese Recommendations: Mozzarella melts beautifully and provides that stretchy texture, while Parmesan adds a nutty flavor. Feel free to experiment with other cheeses like cheddar or provolone for unique tastes.
Cutting and Twisting the Breadsticks
Cutting and twisting your garlic breadsticks can enhance their appeal and texture:
1. Cutting Techniques: Use a sharp pizza cutter or knife to slice the dough into strips about 1 inch wide. For a more decorative touch, you can cut the strips into various lengths.
2. The Twist Method: To create a fun twist, take each strip and hold both ends. Gently twist the dough in opposite directions, creating a spiral effect. This method not only looks appealing but also allows for more surface area, resulting in a crunchier texture.
3. Arranging on Baking Sheet: Place the twisted breadsticks on a parchment-lined baking sheet, ensuring they are spaced apart to allow for rising and baking.
Baking to Perfection
Baking your garlic breadsticks is where the magic happens. Here’s how to achieve that perfect golden brown color:
1. Preheating the Oven: Preheat your oven to 425°F (220°C). A well-heated oven is essential for achieving a crispy exterior.
2. Baking Time: Bake the breadsticks for 12-15 minutes or until they are golden brown and the cheese is bubbly. Keep an eye on them during the last few minutes to prevent burning.
3. Oven Variations: Baking times may vary depending on your oven type. If you are using a convection oven, reduce the temperature by 25°F and check for doneness a few minutes earlier.
4. Finishing Touch: Once out of the oven, brush the warm breadsticks with any remaining garlic butter for an extra layer of flavor.
Serving Suggestions
Your crispy garlic breadsticks are now ready to be served! Here are some delightful serving suggestions:
1. Dipping Sauces: Pair your breadsticks with classic marinara sauce for a traditional touch. Other great options include garlic aioli, ranch dressing, or a spicy marinara for those who enjoy a kick.
2. Pairing with Main Dishes: These breadsticks make an excellent accompaniment to pasta dishes, salads, or as a side to your favorite Italian entrees like lasagna or chicken Parmesan. They can also be served as an appetizer at gatherings or parties.
3. Plating: For an appealing presentation, stack the breadsticks in a tall glass or arrange them on a platter with bowls of dipping sauces on the side. Garnish with additional parsley for a pop of color.
Nutritional Information
Understanding the nutritional value of your crispy garlic breadsticks can help you enjoy them mindfully. Here’s a breakdown per serving (assuming 8 breadsticks):
– Calories: Approximately 180-220 calories
– Fat: 8-12 grams (depending on the amount of butter and cheese used)
– Carbohydrates: 25-30 grams
– Protein: 5-8 grams
These breadsticks are best enjoyed in moderation as part of a balanced diet. They can be a delicious treat when paired with healthy main dishes and sides.
Conclusion
Crispy garlic breadsticks are a delightful addition to any meal or gathering. They are not only easy to make but also customizable to your taste preferences. With the right techniques for rolling out the dough, creating the flavorful garlic butter, and baking them to perfection, you can create a dish that is sure to impress your family and friends. Their irresistible aroma and taste will make them a go-to choice for food lovers everywhere, whether as a side dish, appetizer, or snack. So gather your ingredients, follow these steps, and enjoy the satisfaction of homemade crispy garlic breadsticks that elevate any dining experience!
