
Introduction
There’s a unique charm that comes with creating homemade pastries, invoking memories of warmth and indulgence. Each bite of freshly baked goods transports us back to moments of joy, family gatherings, and celebrations. Among the myriad of delightful desserts, cheesecake stands out for its creamy texture and rich flavor. Today, we’re diving into a recipe that perfectly combines the classic appeal of cheesecake with the burst of freshness from juicy blueberries—Luscious Blueberry Cheesecake Bars.
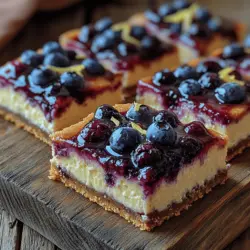
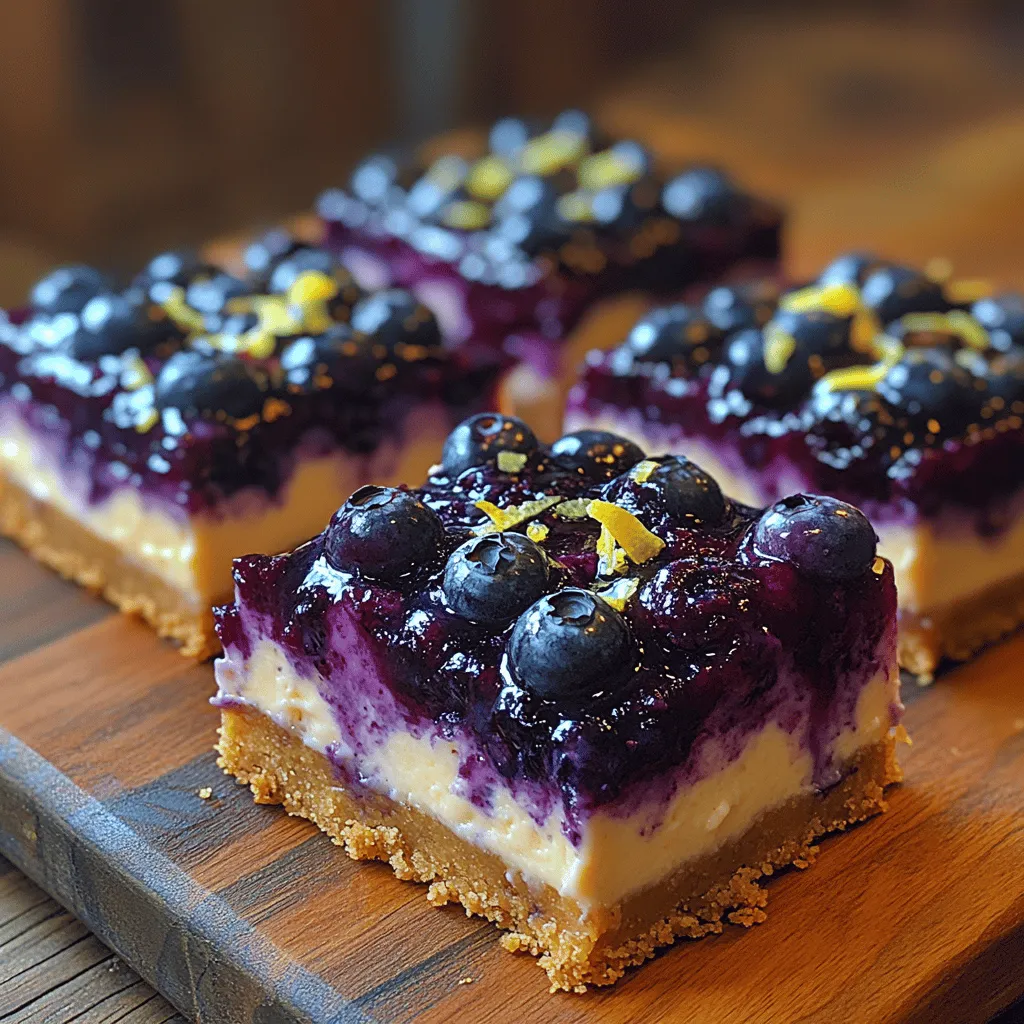
These bars are not just a treat for the taste buds; they’re a feast for the eyes. The vibrant blue hues of the blueberries contrast beautifully with the creamy yellow of the cheesecake filling, making them an irresistible addition to any dessert table. Whether you’re hosting a gathering, looking for a sweet treat to enjoy at home, or even preparing a gift for a loved one, these cheesecake bars are sure to impress.
Understanding Cheesecake Bars
Cheesecake, in its various forms, has a rich history that spans centuries. Originating in Ancient Greece, it was once served to athletes during the first Olympic Games. The Greeks made a simple cheese mixture that was sweetened and baked, a far cry from the decadent cream cheese-based cheesecakes we enjoy today. Over the years, cheesecake evolved, finding its way through various cultures, each adding its unique spin.
In the United States, particularly in New York, cheesecake has become a beloved staple. The classic New York-style cheesecake is known for its dense, creamy texture and rich flavor, often made with cream cheese, sugar, eggs, and a graham cracker crust. Cheesecake bars, on the other hand, offer a more portable and approachable way to enjoy this classic dessert. They’re perfect for serving at parties or simply indulging in at home.
The beauty of blueberry cheesecake bars lies in their balance. The tartness of fresh blueberries cuts through the richness of the cream cheese filling, creating a harmonious blend of flavors. These bars not only satisfy your sweet tooth but also provide a refreshing burst of fruitiness that elevates the traditional cheesecake experience.
Ingredients for Luscious Blueberry Cheesecake Bars
Creating these luscious blueberry cheesecake bars requires a handful of essential ingredients. Each one plays a crucial role in achieving the perfect consistency, flavor, and texture. Here’s a detailed look at what you’ll need:
**1. Cream Cheese**
The star of the show, cream cheese provides the rich and creamy base for the cheesecake filling. Opt for full-fat cream cheese for the best texture and flavor. Ensure it’s at room temperature for easy mixing, which helps achieve a smooth filling without lumps.
**2. Granulated Sugar**
Sugar is essential for balancing the flavors in your cheesecake filling. It not only sweetens the mixture but also contributes to the overall texture. Be sure to sift it if there are any clumps, ensuring a smooth blend with the cream cheese.
**3. Eggs**
Eggs are vital for structure and stability in cheesecake. They help bind the filling together and give it a light, airy texture. Use large eggs, and make sure they are at room temperature to ensure even mixing.
**4. Sour Cream**
Sour cream adds a tangy flavor that enhances the richness of the cheesecake. It also contributes to a creamy texture. If you prefer a lighter option, you can substitute with Greek yogurt, but the taste will slightly differ.
**5. Vanilla Extract**
Vanilla extract is a must for flavoring the cheesecake. It adds depth and warmth to the overall taste profile. Always choose pure vanilla extract for the best flavor; artificial vanilla may not provide the same aromatic qualities.
**6. Fresh Blueberries**
The highlight of our recipe, fresh blueberries, bring a burst of flavor and color to these cheesecake bars. Using fresh blueberries enhances the texture and adds natural sweetness. If fresh berries are unavailable, you can also use frozen blueberries, but ensure they are thawed and drained before using.
**7. Graham Cracker Crumbs**
A classic cheesecake is often built on a graham cracker crust, and these bars are no different. The crumbs create a crunchy base that contrasts beautifully with the creamy filling. You can easily crush the graham crackers in a food processor or by placing them in a zip-top bag and rolling over them with a rolling pin.
**8. Unsalted Butter**
Butter binds the graham cracker crumbs together and adds richness to the crust. Use unsalted butter to control the saltiness of your dessert, and melt it before mixing it with the crumbs.
**9. Lemon Juice (Optional)**
While not strictly necessary, a splash of fresh lemon juice can enhance the flavors of the blueberries and the cheesecake filling. It adds a refreshing brightness that complements the sweetness of the dessert.
Equipment Needed for Making Blueberry Cheesecake Bars
To create these luscious blueberry cheesecake bars, you’ll need some essential kitchen tools and baking equipment. Here’s what you should have on hand:
**1. 9×9-inch Baking Pan**
A square baking pan is ideal for making cheesecake bars. It allows for even baking and helps achieve clean edges when cutting the bars. Line the pan with parchment paper for easy removal once the cheesecake has set.
**2. Mixing Bowls**
You’ll need a few mixing bowls—one for the crust, another for the cheesecake filling, and a smaller one for any additional ingredients like lemon juice or vanilla extract. Opt for glass or stainless steel bowls for durability and ease of cleaning.
**3. Electric Mixer**
A hand-held electric mixer or a stand mixer will make blending the cream cheese, sugar, and eggs much easier. It helps achieve a smooth and creamy filling without lumps.
**4. Rubber Spatula**
A rubber spatula is essential for scraping down the sides of the mixing bowl and folding in any ingredients, such as blueberries, without damaging their delicate structure.
**5. Measuring Cups and Spoons**
Accurate measurements are crucial in baking. Use standard measuring cups and spoons for precise ingredient measurements to ensure your cheesecake bars turn out perfectly.
**6. Oven Thermometer**
An oven thermometer can help you confirm that your oven is at the right temperature. This is important for even baking, especially when making desserts like cheesecake that require careful temperature control.
**7. Cooling Rack**
Once baked, the cheesecake bars should cool completely before cutting. A wire cooling rack allows for proper air circulation around the bars, preventing sogginess.
Step-by-Step Guide to Making Blueberry Cheesecake Bars
Now that you have your ingredients and equipment ready, it’s time to dive into the process of making your luscious blueberry cheesecake bars. Follow these detailed steps for a flawless outcome:
**1. Preparing the Crust**
– Preheat the Oven: Start by preheating your oven to 325°F (160°C). This ensures that your cheesecake bars bake evenly.
– Make the Crust Mixture: In a mixing bowl, combine 1 ½ cups of graham cracker crumbs with ½ cup of granulated sugar. Mix well to combine.
– Add Melted Butter: Pour in ½ cup of melted unsalted butter and stir until the mixture resembles wet sand. The butter should coat the crumbs evenly.
– Press into the Pan: Transfer the mixture to your prepared 9×9-inch baking pan. Use the back of a measuring cup or your fingers to press the crumbs firmly into the bottom. This creates a sturdy base for the cheesecake.
**2. Baking the Crust**
– Bake the Crust: Place the pan in the preheated oven and bake for about 10 minutes, or until the crust is lightly golden. This step helps set the crust and adds flavor.
– Cool the Crust: Once baked, remove the pan from the oven and let the crust cool while you prepare the cheesecake filling.
**3. Preparing the Cheesecake Filling**
– Mix the Cream Cheese: In a large mixing bowl, add 16 ounces of room-temperature cream cheese. Using an electric mixer, beat the cream cheese until smooth and creamy, about 2-3 minutes.
– Add Sugar and Vanilla: Gradually mix in ¾ cup of granulated sugar and 1 teaspoon of pure vanilla extract. Continue to beat until well combined. Scrape down the sides of the bowl to ensure everything is incorporated.
– Incorporate Eggs: Add 2 large eggs, one at a time, mixing on low speed after each addition. Be careful not to overmix, as this can incorporate too much air and lead to cracks in your cheesecake.
– Mix in Sour Cream: Add ½ cup of sour cream and blend until smooth. The sour cream adds creaminess and a slight tang that balances the sweetness.
– Add Blueberries: Gently fold in 1 cup of fresh blueberries using a rubber spatula. Be cautious not to crush the berries as you mix, as you want them to maintain their shape in the filling.
**4. Baking the Cheesecake Bars**
– Pour the Filling: Carefully pour the cheesecake filling over the cooled crust in the baking pan, spreading it evenly.
– Bake the Cheesecake: Return the pan to the oven and bake for 30-35 minutes. The cheesecake should be set around the edges but still slightly jiggly in the center. This ensures a creamy texture once cooled.
– Cool Gradually: Turn off the oven and crack the oven door, allowing the cheesecake to cool gradually for about 1 hour. This helps prevent cracks from sudden temperature changes.
– Chill in the Refrigerator: Once cooled to room temperature, cover the pan with plastic wrap and refrigerate for at least 4 hours or overnight. Chilling allows the flavors to meld and the filling to firm up.
With these steps, you’re well on your way to creating a batch of luscious blueberry cheesecake bars that are sure to impress. Stay tuned for tips on achieving the best results and answers to common questions about this delicious dessert!
Baking the Croissants
To achieve the perfect croissants, the baking process is just as critical as the preparation. Here are essential steps and techniques to ensure your croissants turn out golden, flaky, and irresistibly delicious.
Preheating the Oven: Optimal Temperatures for Baking
The first step in baking croissants is preheating your oven to the right temperature. For optimal results, set your oven to 400°F (200°C). This temperature ensures that the croissants rise beautifully while developing a golden-brown crust. An oven thermometer can help verify your oven’s accuracy, as uneven temperatures can lead to inconsistent baking results.
Baking Techniques for a Golden Finish
Once the oven is preheated, it’s time to bake your croissants. Place the croissants on a parchment-lined baking sheet, ensuring they have enough space to expand. For that coveted golden finish, brush the croissants with an egg wash made from a beaten egg mixed with a tablespoon of water. This not only enhances the color but also adds a subtle sheen to the crust.
Keep an eye on your croissants as they bake. The baking time typically ranges from 15 to 20 minutes. For an even golden color, consider rotating the baking sheet halfway through the baking time. This technique ensures that all sides receive equal heat exposure, resulting in uniformly baked croissants.
The Role of Steam in Achieving the Perfect Crust
One of the secrets behind a flaky crust is steam. When croissants bake, the layers of dough and butter create steam, which separates the layers and leads to that signature airy texture. To boost this effect, you can place a shallow pan filled with hot water on the bottom rack of your oven while the croissants bake. The steam produced adds moisture to the oven, helping the croissants develop that irresistible flaky crust.
Serving Suggestions for Croissants
Croissants are incredibly versatile and can be enjoyed in various ways. Here are some classic and creative serving suggestions to accompany your freshly baked croissants.
Classic Pairings: Coffee, Chocolate, and Jams
A warm croissant pairs beautifully with a steaming cup of coffee or tea. The rich, buttery flavor of the croissant complements the bitterness of coffee, making it a perfect breakfast choice. For a sweeter option, consider spreading your croissant with jam or honey. Raspberry or apricot jams add a delightful fruitiness that pairs well with the rich pastry. Additionally, if you have a sweet tooth, a piece of dark chocolate next to a croissant can make for a decadent treat.
Creative Serving Ideas: Croissant Sandwiches and Breakfast Dishes
For those looking to elevate their croissant experience, consider making croissant sandwiches. Fill your croissants with smoked salmon and cream cheese for a sophisticated brunch option, or go for a classic ham and cheese combination. You can also create a breakfast dish by slicing a croissant in half, filling it with scrambled eggs and sautéed vegetables, and then toasting it in the oven for a few minutes.
Storing and Reheating Croissants for Later Enjoyment
If you have leftover croissants, it’s essential to store them properly to maintain their freshness. Place them in an airtight container at room temperature for up to two days. You can also freeze croissants for longer storage; just wrap them tightly in plastic wrap and place them in a freezer-safe bag. When you’re ready to enjoy them, simply reheat the frozen croissants in a preheated oven at 350°F (175°C) for about 10-15 minutes to restore their flaky texture.
Common Mistakes to Avoid When Making Croissants
Making croissants can be a delicate process, and several common mistakes can hinder your results. Here are some pitfalls to avoid.
Overworking the Dough and Its Consequences
One of the most significant mistakes when making croissants is overworking the dough. This can lead to tough, dense pastries instead of light and flaky ones. When rolling and folding the dough, handle it gently and avoid excessive kneading. If the dough becomes too warm, it can also lose its elasticity, so keep it cool throughout the process.
Importance of Ingredient Temperature
The temperature of your ingredients plays a crucial role in croissant-making. Be sure that your butter is cold and firm when you incorporate it into the dough. This allows for the creation of distinct layers. If your butter becomes too soft, it will blend into the dough rather than remain in solid pieces, which can compromise the flaky texture.
Signs That Your Dough Is Ready for the Next Step
Knowing when your dough is ready for the next step is vital. For instance, after the first rise, the dough should have doubled in size and feel light and airy. When rolling out the dough, it should stretch easily without tearing. If it’s too elastic, let it rest for a few minutes before continuing. This resting period allows the gluten to relax, making it easier to roll out.
Troubleshooting Croissant Issues
Even with careful preparation, issues can arise while baking croissants. Here are solutions to common baking problems.
Flat Croissants: Causes and Fixes
If your croissants come out flat, there may be a few reasons. One common cause is insufficient proofing time. Ensure that you allow your croissants to rise until they have nearly doubled in size before baking. Another reason could be that the dough was rolled too thin, which can result in a lack of structure. Aim for a thickness of about 1/4 inch when rolling out the dough.
Under-Baked Centers: Tips for Ensuring Thorough Cooking
If the outside of your croissants is golden but the center remains doughy, they may need more baking time. Always check for doneness by tapping the bottom; it should sound hollow. If they need additional cooking, return them to the oven for a few more minutes, keeping a close eye to avoid burning.
Unpleasant Textures: What Went Wrong?
An unpleasant texture can result from several issues, including improper folding of the dough or using the wrong flour. Ensure you’re using a high-protein flour, such as bread flour, to provide the necessary structure. Additionally, make sure you fold the dough evenly to create those beautiful layers.
Exploring Variations on Classic Croissants
Once you’ve mastered the classic croissant, consider experimenting with different flavors and fillings.
Sweet Variations: Almond, Chocolate, and Fruit-Filled Croissants
Sweet croissants are a delightful twist on the traditional recipe. Almond croissants are made by filling them with almond paste and sprinkling sliced almonds on top before baking. Chocolate croissants, or pain au chocolat, incorporate dark chocolate sticks inside the dough for a rich, gooey center. For a fruity option, consider filling your croissants with fresh berries and a dollop of cream cheese.
Savory Options: Cheese and Ham Croissants
Savory croissants are also a fantastic option. Fill your croissant dough with shredded cheese and diced ham for a delicious breakfast treat. You can also experiment with different cheeses, such as goat cheese or feta, combined with spinach for a delightful vegetarian option.
Regional Adaptations: Croissant Styles from Around the World
Croissants also have regional adaptations that you might find intriguing. For example, in Argentina, you’ll find medialunas, which are sweet, slightly less flaky croissants served with coffee. In Japan, croissants may be filled with matcha or red bean paste, showcasing a fusion of flavors.
The Joy of Making Croissants at Home
Baking croissants at home is not just about the end product; it’s about the entire experience. The process of making these pastries from scratch can be incredibly rewarding. As you roll out the dough and fold in the butter, you’ll develop a deeper appreciation for the craftsmanship involved in pastry making.
Creating something from scratch, especially as intricate as croissants, provides a sense of accomplishment that is hard to match. Each step, from mixing the ingredients to watching them rise and finally baking them to a perfect golden brown, is a journey filled with learning and satisfaction.
Conclusion
Mastering the art of croissant-making is a journey worth embarking on. From the careful selection of ingredients to the delicate folding techniques, each aspect contributes to the final product. With practice, patience, and a willingness to learn from mistakes, anyone can create these delightful pastries at home.
The joy of sharing homemade croissants with loved ones, whether at breakfast or as an afternoon treat, is unparalleled. So roll up your sleeves, gather your ingredients, and dive into the world of croissant baking. You’ll not only impress yourself but also those lucky enough to share in your delicious creations.