
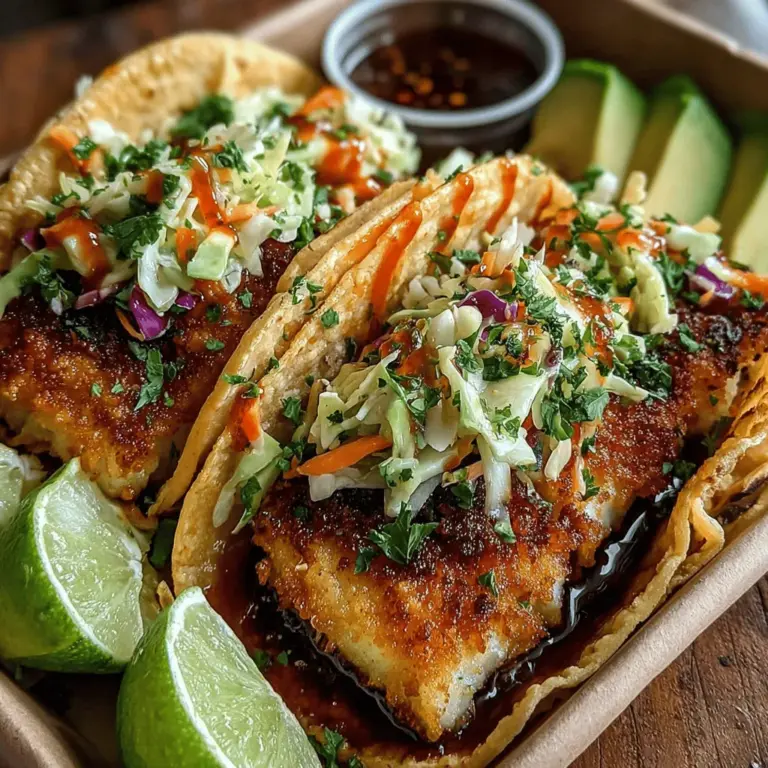
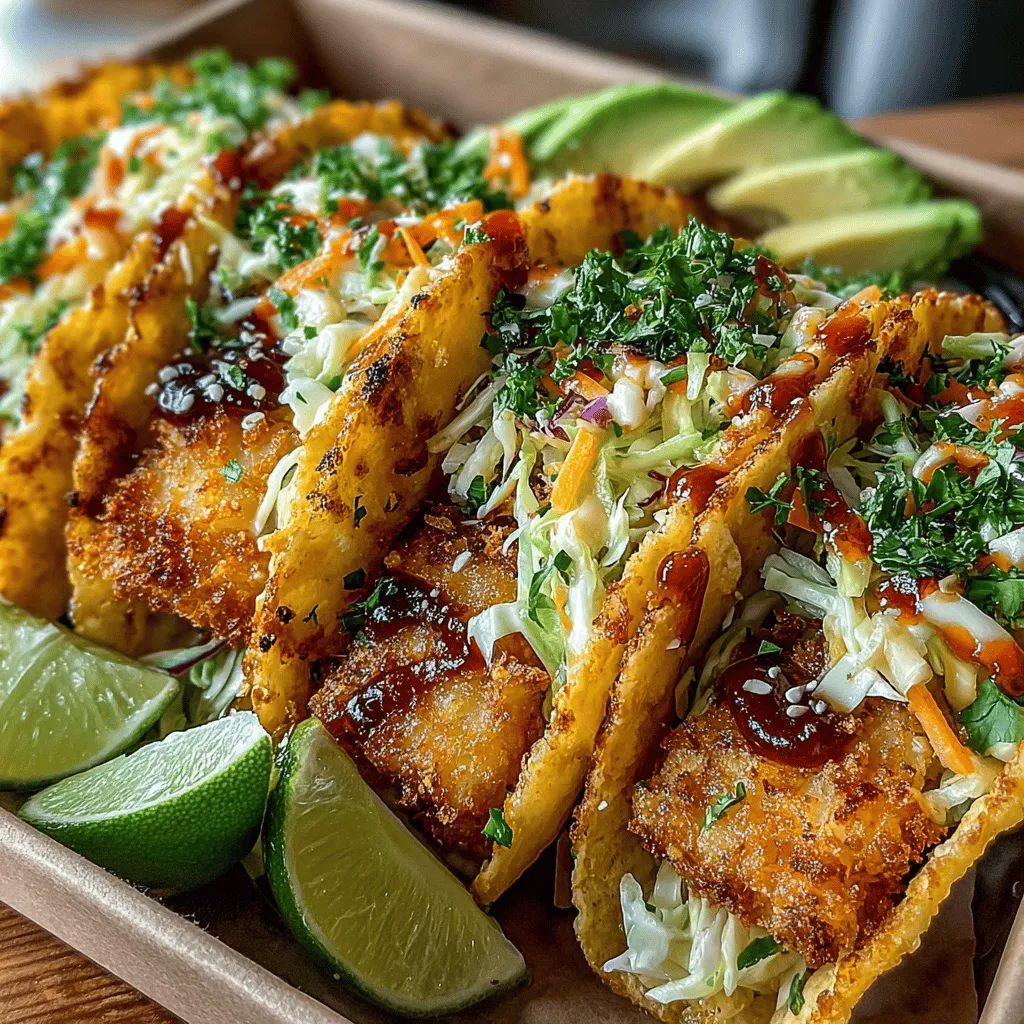
Crispy Air Fryer Fish Tacos with Zesty Slaw
In the world of culinary delights, few dishes resonate with the vibrancy and freshness of fish tacos. Particularly when made in an air fryer, these Crispy Air Fryer Fish Tacos with Zesty Slaw offer a delightful crunch combined with a zesty kick. This dish is not only a feast for the senses but also a healthier alternative to traditional fried tacos, making it ideal for those looking to enjoy a guilt-free indulgence. The air fryer transforms the fish into a crispy, golden-brown masterpiece while minimizing the oil typically used in frying. Whether you’re planning a casual dinner for your family or a festive gathering with friends, these fish tacos are sure to impress everyone at the table.
Fish tacos have their roots in the coastal regions of Mexico, where fresh seafood is abundant and celebrated. Over the years, they have gained popularity far beyond their origins, captivating food lovers with their combination of fresh flavors and textures. The beauty of fish tacos lies in their versatility; they can be customized in various ways, from the type of fish used to the toppings that accompany them. In this recipe, we will explore how to create crisp and flavorful fish tacos using an air fryer, paired with a zesty slaw that adds a refreshing contrast.
Let’s dive into this delicious recipe, exploring the ingredients, preparation methods, and how to bring it all together for a mouthwatering experience.
Understanding the Ingredients
The foundation of any great dish lies in its ingredients. For these fish tacos, we will explore the components that make them extraordinary. Selecting the right ingredients is crucial not only for flavor but also for achieving the perfect texture and balance in your dish.
Key Ingredients for the Fish
When it comes to choosing the fish for your tacos, a few options stand out: cod, tilapia, and halibut. Each of these varieties offers a mild flavor and flaky texture that pairs beautifully with the seasonings and slaw.
– Cod: This fish is known for its light, flaky texture and mild flavor, making it a popular choice for fish tacos. It holds its shape well during cooking and absorbs flavors beautifully.
– Tilapia: Another mild-flavored fish, tilapia is often favored for its affordability and availability. Its slightly firmer texture makes it ideal for air frying, allowing it to achieve a satisfying crispiness.
– Halibut: For a more premium option, halibut offers a rich, buttery flavor and firm texture. Although it can be more expensive, it elevates the dish to a gourmet level.
Once you’ve chosen your fish, the importance of seasoning cannot be overstated. A well-seasoned fish is the backbone of flavorful tacos. For this recipe, a combination of paprika, garlic powder, onion powder, and a hint of cayenne pepper will enhance the fish’s natural flavors and provide a subtle kick.
Additionally, panko breadcrumbs play a crucial role in achieving the perfect crispiness. These Japanese-style breadcrumbs are lighter and flakier than traditional breadcrumbs, creating a delightful crunch when cooked in the air fryer.
Creating the Zesty Slaw
No fish taco is complete without a refreshing slaw to complement the crispy fish. The significance of fresh vegetables in the slaw cannot be overlooked. For this recipe, we will use a blend of green cabbage, red cabbage, and carrot.
– Green Cabbage: This variety adds a nice crunch and serves as the base for the slaw. Its mild flavor allows the other ingredients to shine.
– Red Cabbage: Not only does red cabbage add a pop of color, but it also provides a slightly more robust flavor and additional crunch.
– Carrot: Shredded carrots add a touch of sweetness and a vibrant color, enhancing the visual appeal of the slaw.
To elevate the flavor profile, we will incorporate fresh cilantro and lime juice. The bright, citrusy notes of lime juice enhance the freshness of the vegetables, while cilantro adds a herbaceous touch that ties everything together.
Striking a balance between creaminess and tanginess is essential for a perfect slaw. In this recipe, we will combine mayonnaise, apple cider vinegar, and honey to create a dressing that is both rich and zesty. This mixture will provide the slaw with a creamy texture while the vinegar and honey introduce a delightful acidity and sweetness that cuts through the richness of the fish.
Tortillas and Additional Toppings
The choice of tortilla can significantly affect the overall taste and texture of your tacos. For our crispy fish tacos, you can opt for either corn or flour tortillas, each offering its unique attributes.
– Corn Tortillas: These are traditional for fish tacos and offer a slightly nutty flavor. They are gluten-free and provide a wonderful texture that complements the crispy fish.
– Flour Tortillas: Soft and pliable, flour tortillas are a popular alternative that adds a chewy texture. They are great for holding all the delicious fillings without breaking apart.
To elevate your tacos further, consider adding optional toppings such as avocado slices, lime wedges, and your favorite hot sauce. These toppings add layers of flavor and texture, enhancing the overall taco experience.
Preparation Steps for Success
An overview of the preparation process will ensure that readers can follow along with ease. Proper preparation is key to achieving delicious results, and a well-organized kitchen setup will streamline the cooking process.
Preparing the Fish
To start, you’ll want to prepare the fish to ensure it’s ready for coating and cooking. Begin by drying the fish fillets with paper towels; this step is crucial for achieving that coveted crispiness. Excess moisture can lead to soggy fish, so take your time to ensure they are thoroughly dried.
Next, cut the fish into strips or bite-sized pieces, depending on your preference. This will make it easier to assemble the tacos and allow for even cooking in the air fryer.
Once your fish is cut, it’s time to season it. In a bowl, combine your spices—paprika, garlic powder, onion powder, and cayenne pepper—then sprinkle the mixture generously over the fish. Make sure to coat each piece evenly, allowing the flavors to penetrate the fish.
Creating an assembly line for coating the fish can make the process more efficient. Set up a station with a plate of seasoned fish, a bowl of panko breadcrumbs, and a lined air fryer basket. Start by dipping each piece of fish into the panko, pressing gently to ensure the breadcrumbs adhere well. The goal is to create a thick, crunchy coating that will crisp up beautifully in the air fryer.
As you prepare the fish, preheat your air fryer according to the manufacturer’s instructions. Preheating ensures that the fish cooks evenly and achieves that delightful golden-brown color.
With your fish seasoned and coated, you’re ready to move on to the next steps of assembling your tacos and creating the zesty slaw that will complement your crispy fish perfectly. Stay tuned for the continuation of this delicious recipe, where we will dive into the preparation of the zesty slaw and the final assembly of these irresistible fish tacos.
Coating Techniques for Optimal Crispiness
To achieve the perfect crispy texture for your fish tacos, a three-step coating process is essential: flour, egg, and panko. This method not only enhances the flavor but also adds an irresistible crunch that will elevate your taco experience.
The Three-Step Coating Process
1. Flour: Start by dredging your fish fillets in all-purpose flour. This initial coating helps the egg adhere better, creating a more substantial layer of crunch. Ensure that the fish is evenly coated, shaking off any excess flour.
2. Egg: Next, dip the floured fish into beaten eggs. This step is crucial as it binds the panko breadcrumbs to the fish. Make sure to coat the fish thoroughly, allowing any excess egg to drip off before moving to the next step.
3. Panko Breadcrumbs: Finally, press the fish into panko breadcrumbs. These Japanese-style breadcrumbs provide an extra crunchy texture that regular breadcrumbs cannot match. For an even coverage, gently press the panko into the fish to ensure it sticks well.
Tips for Even Coverage and Avoiding Clumps
– Use Separate Dishes: Set up a dredging station with three shallow dishes: one for flour, one for eggs, and one for panko. This organization helps streamline the process and prevents clumping.
– Work in Batches: To ensure even coverage, work with a few fish pieces at a time. This prevents the coatings from clumping together and ensures each piece gets the attention it needs for a perfect coat.
– Keep It Light: Avoid packing the panko too tightly onto the fish. A light touch will yield a crispier result, as it allows the hot air to circulate around the breadcrumbs in the air fryer.
Air Frying to Perfection
Air frying your coated fish is where the magic happens. The air fryer allows for a deliciously crispy exterior without the need for deep frying, making this a healthier option.
Setting the Right Temperature and Time
For optimal results, preheat your air fryer to 400°F (200°C). This high temperature is key to achieving that delightful crunch. Cook the coated fish for 10-12 minutes, flipping halfway through to ensure even crisping on both sides.
The Importance of Not Overcrowding the Air Fryer Basket
One of the most common mistakes when air frying is overcrowding the basket. To achieve that perfect crispiness, it’s crucial to give each piece of fish enough space. If the basket is too full, the air cannot circulate properly, leading to soggy coatings. Cook in batches if necessary, allowing each piece to get the hot air it deserves.
Checking for Doneness: Internal Temperature Guidelines
To ensure your fish is cooked perfectly, use a food thermometer to check the internal temperature. The fish should reach an internal temperature of 145°F (63°C). When cooked correctly, the fish will flake easily with a fork, indicating it is ready to be enjoyed.
Making the Slaw
A zesty slaw is the perfect companion to your crispy fish, adding freshness and a delightful crunch. Here’s how to make it:
Step-by-Step Instructions for Combining Vegetables with the Dressing
1. Prepare the Vegetables: Begin by finely shredding your cabbage (green or red, based on preference), carrots, and any other vegetables you desire. A mix of colors not only looks appealing but adds varied flavors.
2. Make the Dressing: In a small bowl, whisk together sour cream, lime juice, honey (or agave for a vegan option), and a pinch of salt. Adjust the lime juice and honey to taste, ensuring a good balance between tangy and sweet.
3. Combine: In a large mixing bowl, combine the shredded vegetables and pour the dressing over them. Toss everything together until the vegetables are well-coated. Allow the slaw to sit for about 10-15 minutes before serving. This resting period lets the flavors meld beautifully.
Tips for Achieving the Right Consistency and Flavor Balance
– Taste as You Go: Adjust the dressing ingredients based on your preference. If you like it tangier, add more lime juice; for sweetness, add a touch more honey.
– Texture Matters: Ensure your vegetables are cut uniformly to maintain a consistent texture in every bite. Use a mandoline slicer for thin, even cuts if you have one on hand.
Warming the Tortillas
Warming your tortillas is a crucial step to enhance the overall taco experience. Warm, pliable tortillas make assembly easy and enjoyable.
Techniques for Warming Tortillas in a Skillet
1. Dry Heat: Heat a skillet over medium heat. Once hot, place the tortillas in the skillet without any oil. Warm for about 30 seconds on each side, or until they become soft and flexible.
2. Cover to Steamer: For an even softer tortilla, you can cover the tortillas with a lid or a damp towel in the skillet. This traps steam and helps to make them more pliable.
Discussion on the Importance of Pliable Tortillas for Assembly
Pliable tortillas are essential for successfully assembling your tacos. If they are too stiff, they are likely to crack or break, making it difficult to enjoy the tacos. By warming them properly, you create a perfect vessel for your crispy fish and zesty slaw, enhancing both the flavor and the eating experience.
Assembling the Tacos
Now that you have all your components ready, it’s time to assemble your tacos for a delicious meal.
Visualizing the Assembly Process: Layering Fish and Slaw
1. Start with the Tortilla: Place a warm tortilla flat on a plate.
2. Add the Fish: Lay two or three pieces of the crispy air-fried fish on the tortilla, depending on their size.
3. Top with Slaw: Generously spoon the zesty slaw over the fish, allowing the vibrant colors to show.
4. Optional Toppings: Feel free to personalize your tacos with additional toppings such as sliced avocado, fresh cilantro, diced tomatoes, or a drizzle of spicy crema for an extra kick.
Ideas for Personalizing Tacos with Optional Toppings
– Salsas: Add a spoonful of fresh salsa or pico de gallo for a burst of flavor.
– Creamy Elements: Consider adding a dollop of guacamole or a drizzle of chipotle mayo for creaminess.
– Crunchy Toppings: Crumbled queso fresco or feta cheese can add a delicious salty contrast to the freshness of the slaw.
Serving Suggestions
Presentation is key when serving these delightful fish tacos, and with a few thoughtful touches, you can impress your guests.
Plates and Garnishes to Enhance Presentation
Serve the assembled tacos on a vibrant platter garnished with lime wedges and fresh herbs. This not only enhances the visual appeal but also adds a pop of color to your table. For an extra touch, consider placing the tacos on a bed of shredded lettuce to provide a nice contrast and an additional layer of texture.
Pairing Ideas: Sides and Beverages That Complement Fish Tacos
– Side Dishes: Serve with a side of black beans, corn salad, or a refreshing cucumber salad. These sides complement the flavors of the fish and slaw beautifully.
– Beverage Pairings: For beverage pairings, consider a crisp, chilled beer or a refreshing margarita. If you prefer non-alcoholic options, a sparkling limeade or hibiscus iced tea can be delightful.
Conclusion
Crispy Air Fryer Fish Tacos with Zesty Slaw represent a perfect harmony of flavors and textures. With a simple preparation process, these tacos not only deliver on taste but also align with healthier cooking methods. Whether you are a seasoned cook or a novice in the kitchen, this recipe invites you to explore the delightful world of homemade tacos. Enjoy the satisfying crunch of the fish, the zing of the slaw, and the warmth of the tortillas as you create a meal that is both nourishing and enjoyable. Dive into this culinary experience and make these tacos a staple in your dining repertoire.
